Quick Tip – Apply Pro Photo Effects with Photoshop CS6′s Color Lookup Adjustment


Did you know you can apply photo effects in seconds with Photoshop CS6? The new Color Lookup adjustment is a great way to quickly add professional photo effects without actions or other adjustment layers. This Photoshop quick tip will show you how you can manipulate this tool to apply awesome film effects to your photos.

What is the Color Lookup adjustment?

The Color Lookup adjustment (new in CS6) is a hidden gem; one of the best features for photographers but also the least known. This adjustment is more well known in the video editing industry where it is used to simulate the colors of films, screens, and other devices. Photographers can make use of this adjustment to apply quick and professional photo effects to their photos.
You can get access this adjustments in the Adjustments palette (Window > Adjustments). Select the Color Lookup adjustment then click on any of the 3 dropdown menus to pick the color profiles you’d like to use.
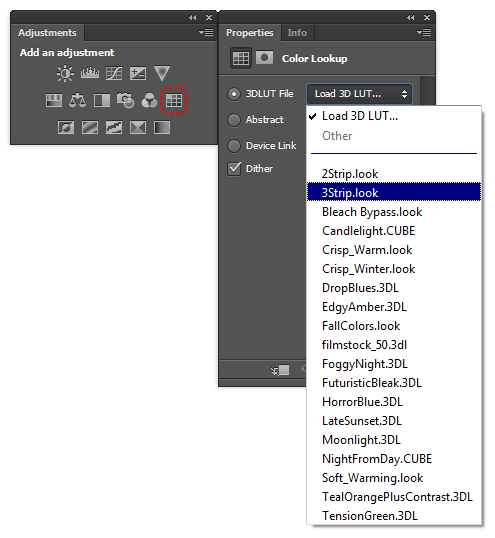
Color Lookup adjustment 
Color Lookup Adjustment
 
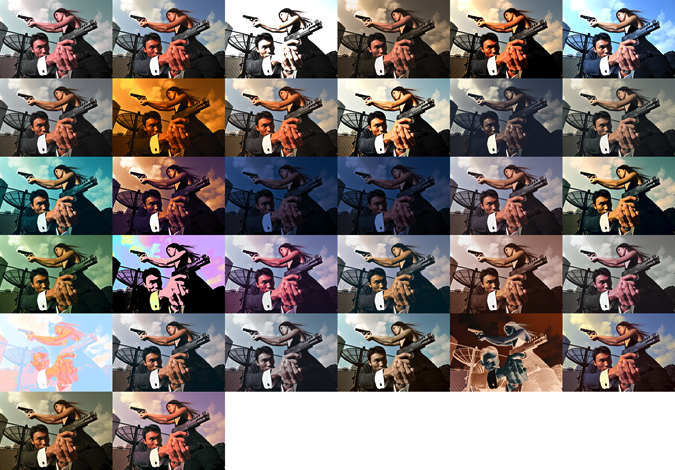
Photoshop comes with 32 color profiles

Our favorite color profiles

Here are some of our favorite color profiles that we think works well with photos.

2 and 3 Strip

This process gives your photos a retro color look frequently seen in movies from the 1920-1950s. You’ll find this effect used in movies such as The Aviator (2004)The Wizard of Oz (1939), and The Adventures of Robin Hood (1938).
 
First Technicolor camera from the 1930s
 
Comparison of 2 Strip and 3 Strip Technicolor
 
2 and 3 Strip color profiles in the Color Lookup properties panel
 
2 Strip Technicolor
 
3 Strip Technicolor

RedBlueYellow and TealMagentaGold

These two color profiles changes from RGB (Red, Green, Blue) to Red Blue Yellow and Teal Magenta Gold. They’re great for creating retro photo effects similar to the ones you’d find in Instagram and many retro Photoshop actions – except now you can create the look with just one adjustment!
 
Comparison of RGB, RBY, and TMG
 
RedBlueYellow and TealMagentaGold in the Color Lookup properties panel
 
Red Blue Yellow
 
Teal Magenta Gold

FuturisticBleak and AnimePalette

These two color profiles are great for creating a low-vibrancy photo effect. Futuristic Bleak lowers the vibrancy of the colors and darkens the white slightly. The Anime Palette looks a little similar but leaves the brightness of the whites alone and has more vibrant blues and greens. 
Comparison of Futuristic Bleak and Anime Palette
 
FuturisticBleak and AnimePalette in the Color Lookup properties panel
 
Futuristic Bleak
 
Anime Palette

Duotones

Under the abstract dropdown menu, you can find many two tone color profiles.
 
Comparison of duotone color profiles
 
Duotone color profiles in the properties panel

How are color profiles different?

Color profiles transform a range of input colors into another and this means that you get:
  • consistent effect throughout multiple photos.
  • genuine look without artifacts caused processing beyond the images tonal and color range
  • photo effects that cannot be created in any other ways
Quick Tip: Access the Hidden Photographic Toning Gradients in Photoshop CS6


Want a quick way to tone or split-tone your photos? Photoshop CS6 comes preloaded with photographer-created Gradient Map presets but they’re hidden somewhere inside Photoshop. Read this tutorial and find out where to find them and how to use them to create a professional split-toning effect. A printable toning presets chart is also included for you to use as a reference.

The Photographic Toning Effects

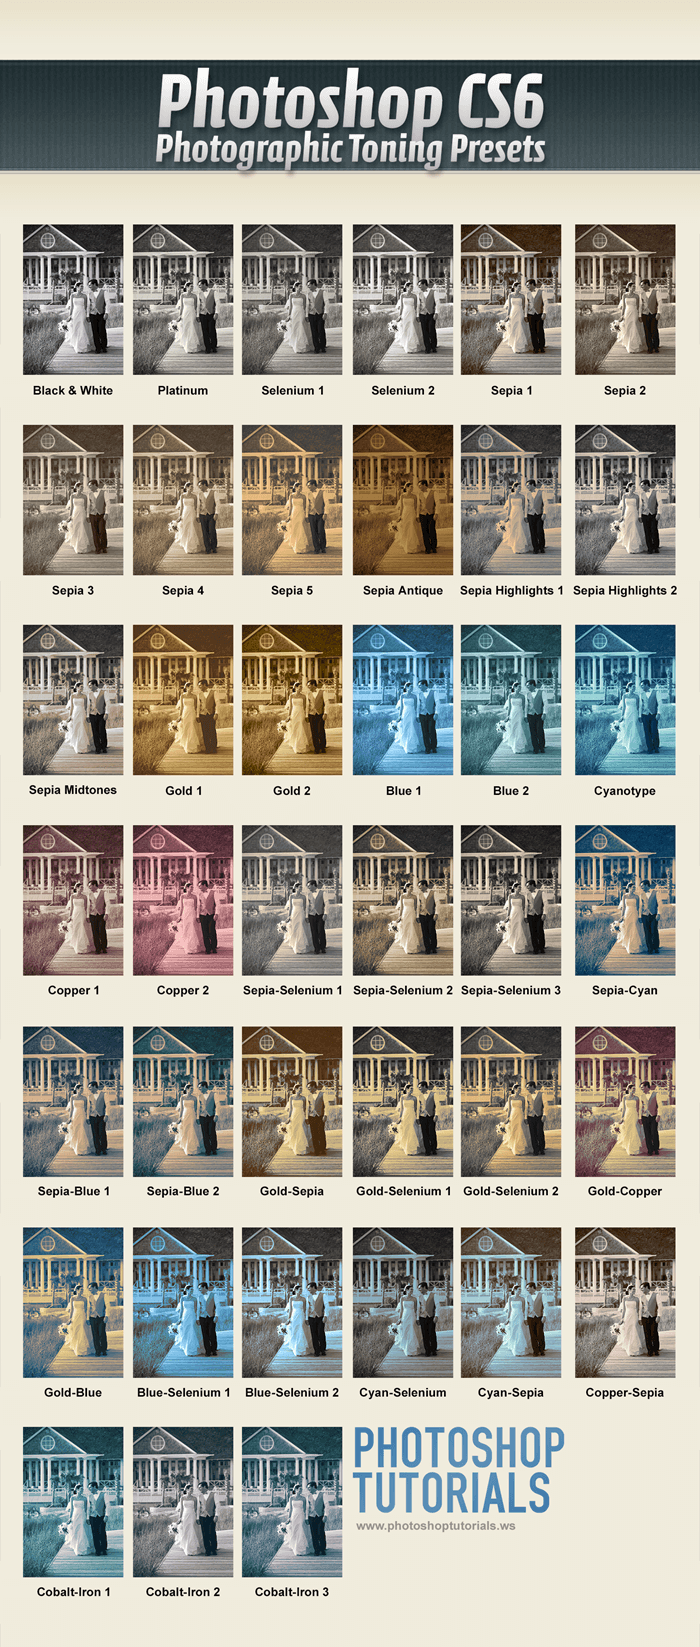
Photoshop CS6 comes loaded with 39 presets to simulate traditional darkroom toning and split-toning effects. Click on the image to download the high-res version you can print.
Split Toning Presets

Step 1

Open an image you want to split tone in Photoshop. For this tutorial, we’ll be using the image below as an example.

Step 2

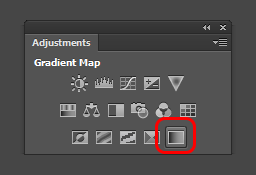
Add a new Gradient Map adjustment layer. You can do this by clicking on the Gradient Map fill layer button in the Adjustments panel (Window > Adjustments).

Step 3

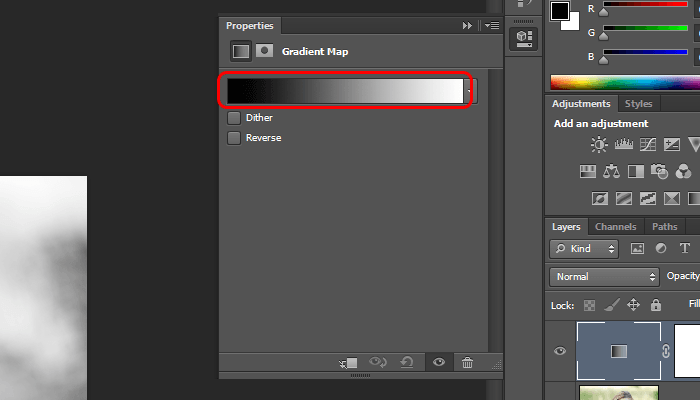
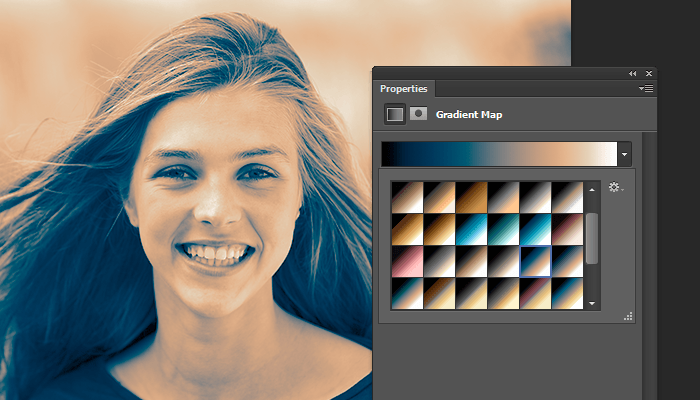
In the Properties panel (Window > Properties), click on the Gradient. This will bring up the Gradient Editor.

Step 4

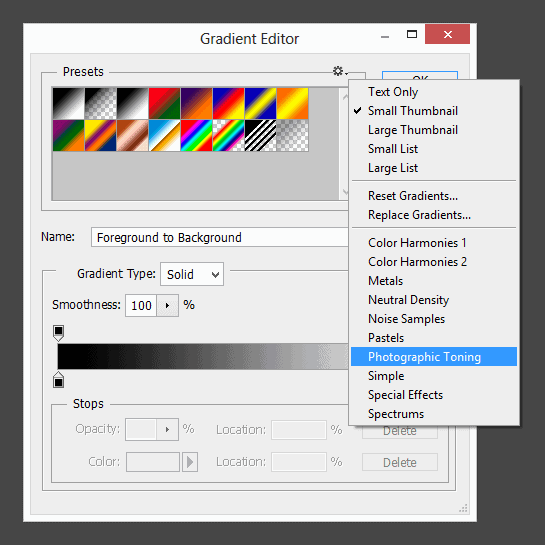
This is where the photographic toning presets are hidden. Click on the panel menu located on the top-right of the presets area then select Photographic Toning.

Step 5

Try out the different gradients to find the one that you like. Most of them will look pretty strong, but we’ll minimize this in the next step.

Step 6

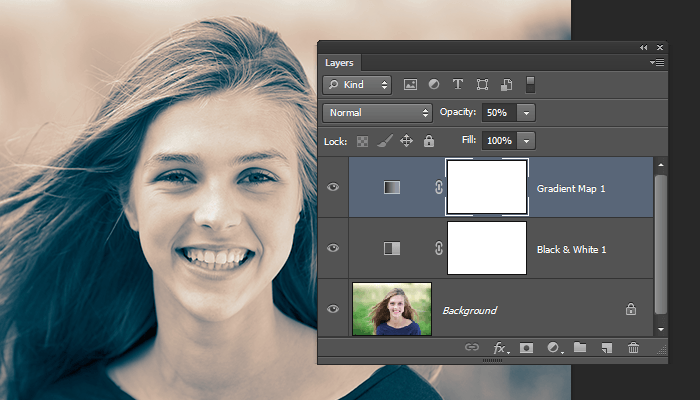
One way to reduce the look of it is to add a Black and White adjustment layer (Layer > New Adjustment Layer > Black & White). Position this layer between the two layers then adjust the opacity of your Gradient Map. Here’s what ours look like with the Gradient Map at 50%.

Final Results

handle
Split Toning

Medical Imaging with DICOM files


DICOM is the industry standard format for medical scans. Learn how DICOM files are used with Adobe Photoshop CS3 Extended to create animations and measurements.

Opening DICOM Files

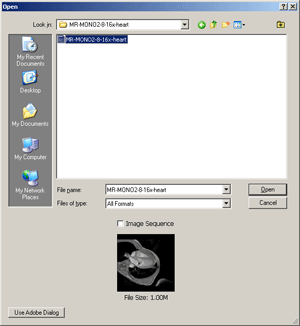
To open DICOM files, open the File menu and choose Open. Browse for the DICOM file and click Open.
Photoshop Open
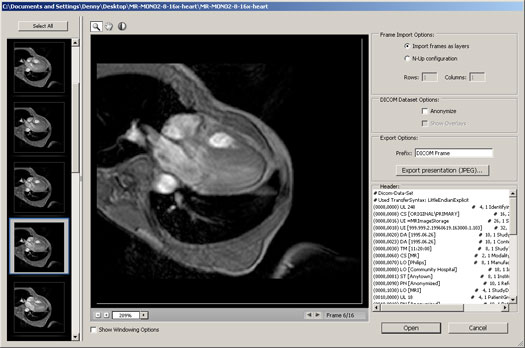
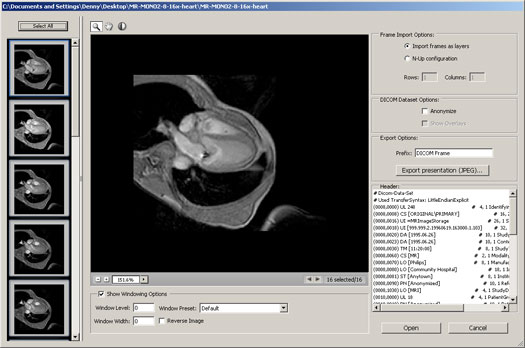
Once you click Open, a window will appear with settings you can modify.
Photoshop DICOM

Options


Frames

On the left, you can select which frame to view and open. To open a single frame, select the frame and click open. To select more than one, hold the CTRL key and click. To select all the frames, click the Select All button.

DICOM Dataset Options

There are two options in this area you can modify

Anonymize

Checking this option will anonymize the file by replacing all patients metadata with "anonymize".

Show Overlays

If your file has overlays such as annotations, curves, or text, you can check this box to display those overlays.

Windowing

Windowing lets you adjust the brightness and contrast of the image. To view all the Windowing options, check the Show Windowing Options checkbox located below the image.

Presets

There are 5 presets you can choose from:
  • Default
  • Lung
  • Bone
  • Abdomen
  • Full

Manual Adjustments

Or, you can manually adjust the settings using your mouse:
  1. Click on the Window Level Tool button to select the Window Level tool.
  2. Click on the middle of the image and drag the tool up or down to adjust the level.
  3. Drag the tool left or right to adjust the width.

Reverse Image

To reverse the image, simply check the Reverse Image checkbox.

Frame Import Options

This area lets you choose how you would like to open the images.
Layers vs N-Up
N-Up Configuration

Import frames as layers

This option will import frames into layers. This option is useful for manipulating the image or creating an animation.
N-up Configuration
This option will tile the frames onto one layer. Select this option if you would like to print the frames onto transparencies.

Creating an Animation


Step 1

Open a DICOM file. Open the File menu and select Open. Browse for a DICOM file (.dc3, .dcm, .dic, or no extension) and click OK

Step 2

Press the Select All button to select all the frames. In the Frame Import Options, choose Import frames as layers. Apply any other settings needed then click OK.
DICOM Window

Step 3

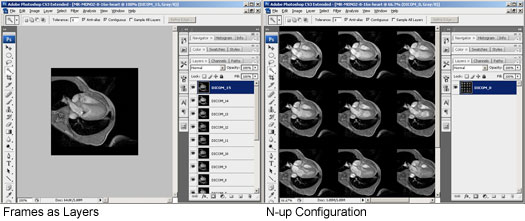
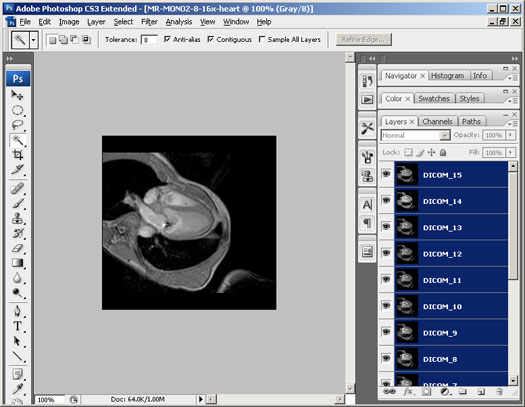
You should now have each frame as layers. Select all the layers by pressing Alt+Ctrl+A or going into the Select menu and choosing All Layers.
Frames as Layers

Step 4

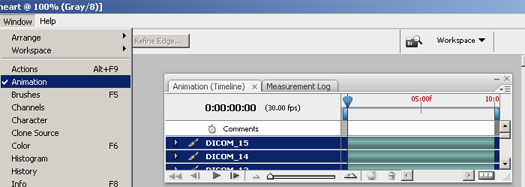
Open the Animation window by going into the Window menu and selecting Animation.
Photoshop Animation Pallet

Step 5

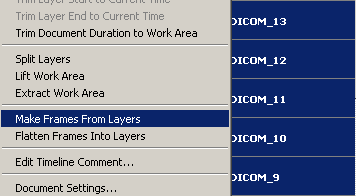
In the Animation pallet, click on the flyout button located near the top right to open the flyout menu. In the flyout menu, select Make Frames From Layers.
Make Frames From Layers

Step 6

If the Animation window is not in Frame view, press the Frame View button to convert the animation into a frame animation. If it’s already in frame view, you can skip this step.
Timeline vs Frames

Step 7

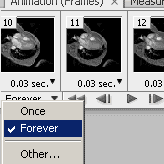
Now we need to set how many times it should loop. Click on the bottom right menu to select how the animation should loop. To have the animation loop forever, select Forever.
Loop Forever

Step 8

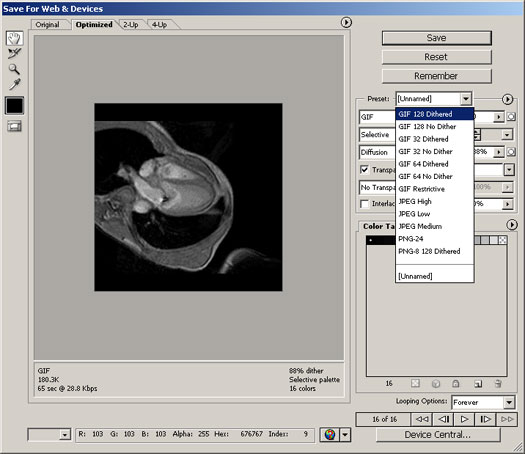
To save the animation as an animated GIF file, use the Save for Web & Devices tool. To open the Save for Web & Devices tool, press Shift+Ctrl+S or open the File menu and select Save for Web & Devices. In the Save for Web & Devices tool, Select a GIF preset and modify the settings if necessary. Click the Save button when you are ready to save.
Photoshop Save for Web & Devices

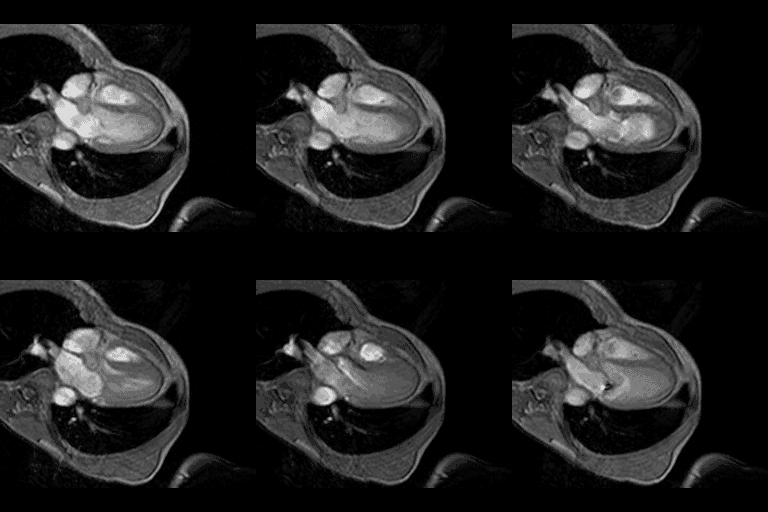
Final Results

Heart Animation

Automating Actions to Save Time


Want to save some time so you’re not doing repetitive things in Adobe Photoshop? Look no further than the Actions palette. Let’s say you to need to adjust settings, add a filter, resize, or any of the other many options in Photoshop to a large number of photos. Instead of having to go through each photo one at a time, applying effects, resizing, or adjusting levels for example, it’s much easier to edit one photo and record the actions. Then, we can apply that action to an entire folder of images.

Preview of Final Results


Automating Actions Photoshop Tutorials


Step 1

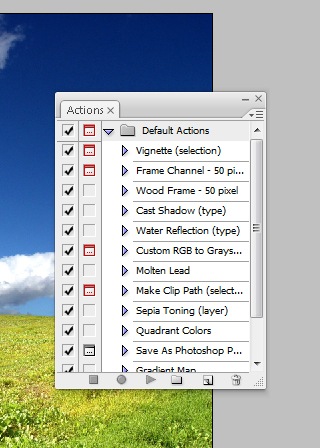
Go ahead and get a bunch of photos and place them into a folder. Open one of the photos in Photoshop. Select one which we’ll edit and record the changes for the action. Go to Window>Actions to open the Actions palette.
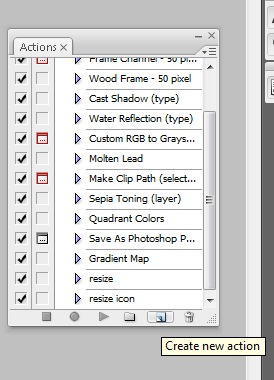
Photoshop actions palette

Step 2

Click the Create New Action icon on the bottom of the Actions palette.
Create a new Photoshop action

Step 3

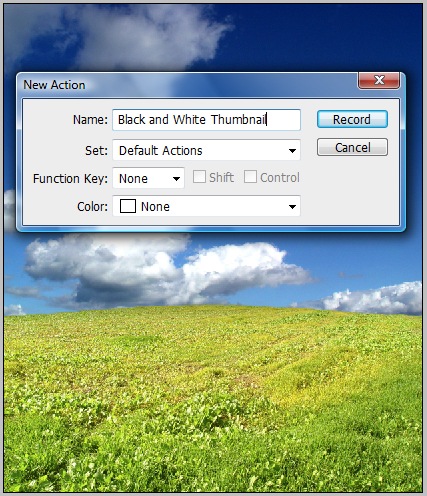
Name is “Black and White Thumbnail” and click Record. There are some other options, such as assigning a Function Key or changing the set of actions it’s placed, but leave those for this example as we don’t want to assign a function key and want to keep it in the default actions set.
New action settings

Step 4

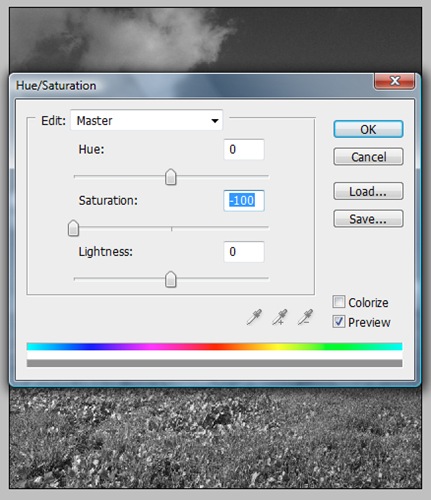
Everything we do next will be recorded as a step in the action. While there are many ways to convert an image to black and white, such as going to Image>Adjustments>Black and White, let’s do a simple desaturation for this example. Go to Image>Adjustments>Hue/Saturation and drag the saturation to the left and click OK.
Desaturating with the Hue/Saturaiton tool

Step 5

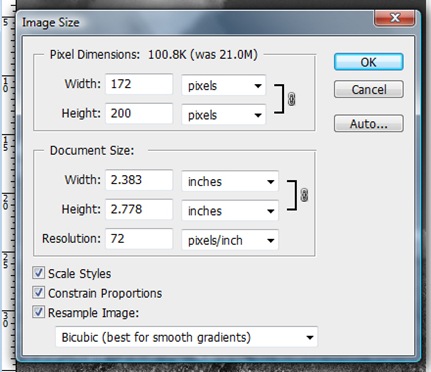
Go to Image>Image Resize and change the Height to 200. As long as the Constrain Proportions is checked, the Width should resize automatically. Click OK.
Image size tool

Step 6

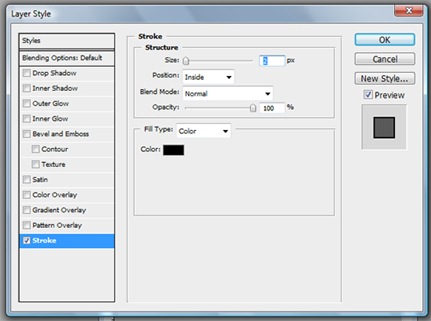
Now that it’s black and white and resized to a thumbnail, we need to add a border. Double-click the Background layer in the Layers palette and click OK to make it a normal layer that we can apply layer styles to. Go to Layer>Layer Style>Stroke. Change the Position to Inside, the Size to 2 and click OK.
Stroke layer style

Step 7

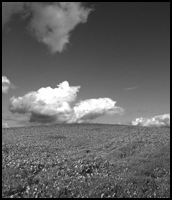
Now we need to save it with certain settings. Go to File>Save As and save it as a JPEG to a new folder named Thumbnails. Finally, click the Stop Playing/Recording icon on the bottom of the Actions palette. Now we have created an action that converted a color image to a black and white, resizes it to a thumbnail, adds a 2-point interior stroke, and then saves it as a JPEG. Close the file and don’t save changes so we don’t erase the original file.
Black stroke added

Step 8

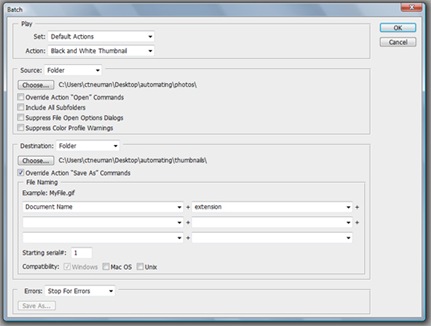
Now that we’ve created the action titled Black and White Thumbnail, go to File>Automate>Batch. Set the Action to Black and White Thumbnail. Click the Choose button near the source folder setting and find and select the folder of images to apply the action to. Click the Choose button near the Destination folder setting and find and select the folder to save the thumbnail images to. I set the source folder to one called Photos and I set the destination folder to one called Thumbnails. Also make sure to check Override Action “Save As” Commands since we already have a save command in the action.
Batch tool

Step 9

Now all seven photos from the source folder, originally full color and large size, have been saved as black and white thumbnails with a border in a separate folder. Remember, instead of editing photos one at time, when we want to edit many of them with the same effects, try actions instead.